How to build an Ethereum wallet app with React Native | Chapter 2 | The multi-currency wallet


In the first chapter of this article series, we built the first steps of an Ethereum wallet. At this point, we can create a new Ethereum account with the application, we can restore it via the mnemonic words plus the custom password and we can manage it in the wallet app. If you missed the article, I suggest checking it first:
How to build an Ethereum wallet app with React Native | Chapter 1 | The wallet
In this article, we are going to build further the application by adding an interesting new feature, extending the supported tokens with the Polygon network's Matic token. By the end of this article, you will be able to create Ethereum and Polygon addresses and manage them in the wallet application. Of course, it is not a real asset management yet, by the end of this article, you will be able to review the balance of these accounts.
Technical overview
The article focuses on handling an extra network, namely Polygon. It is important to note that choosing an Ethereum-based network makes our life easier because the address and private key structure are the same in both cases. First, let's see the technical overview of this functionality.
Polygon
Polygon, formerly known as Matic Network, is a layer 2 scaling solution for Ethereum. It aims to address some of the limitations of Ethereum, such as high fees and slow transaction speeds, by providing a more efficient and scalable infrastructure for decentralized applications (dApps) and blockchain projects.
Polygon uses a combination of technologies, including Plasma chains, sidechains, and a Proof-of-Stake (PoS) consensus mechanism, to provide fast and secure transactions at a low cost. By offloading some of the network traffic from the Ethereum mainnet to the Polygon network, dApps can benefit from higher throughput and faster confirmations, while users can enjoy lower gas fees.
Adding a Polygon address to the wallet will enable us to test the transactions much faster. Another reason we choose Polygon is the address and private key generation method is the same as we used for Ethereum addresses, so we can reuse the big part of the created code and functionalities.
Technical prerequisites
To complete this part of the wallet development, you need the code base from the first part of this article series. You can review or download the code base from Github.
Polygon endpoint
If you followed the Ethereum endpoint creation in the previous article, you already have an Infura account. If not, you can create a new one following the official documentation. On the dashboard of the created project, you can activate the Polygon endpoint and then paste the URL to the .env file.
...
POLYGON_ENDPOINT=https://polygon-mumbai.infura.io/v3/...
Support Polygon account
For the sake of simplicity, the app will generate the Polygon address parallel with the Ethereum address. In fact, the Polygon address will be the same as the generated Ethereum address. In this case, we will be able to restore both accounts at the same time based on the same mnemonic words and password. If you are interested, you can extend the app with the functionality of managing custom Polygon and Ethereum accounts but it will definitely add more complexity to it. It is important to note that even though the addresses are the same, the balances of the accounts will be separated, you can have some Ethereum tokens on the Ethereum account and you can have some Matic tokens on the Polygon account but you can not move these balances between the two account easily, only by a bridge or an exchange that supports this kind of transactions.
To achieve a nice architecture to support multi-currency accounts in our app, we need to reorganize the code a little bit. We will have separate providers for each cryptocurrency account and we will have a custom hook to manage the available accounts. We will also use some custom hooks in the provider to make the code cleaner and make those parts reusable across the accounts.
The goal of this section is to build an architecture that supports working with multiple currencies in our application. However, there can be big differences in currencies on different networks, at this point the goal is to have a framework to build multi-currency support on Ethereum-based tokens.
# src/context/ethereum.provider

export const EthereumAccountProvider = ({
  children,
}: PropsWithChildren<EthereumAccountProviderProps>) => {
  const type = CurrencyTypes.ethereum;
  const {account, loadWallet, resetAccount} = useAccount(type);
  const {currencyPostfix} = useConfig(type);

  const {balance, isLoading: isBalanceLoading} = useBalance(
    account?.address,
    type,
  );

  const state: EthereumAccountContext = {
    account,
    balance,
    isBalanceLoading,
    currencyPostfix,
    loadWallet,
    resetAccount,
  };

  return (
    <EthereumAccountState.Provider value={state}>
      {children}
    </EthereumAccountState.Provider>
  );
};
Similarly, we have a Polygon provider.
# src/context/polygon.provider

export const PolygonAccountProvider = ({
  children,
}: PropsWithChildren<PolygonAccountProviderProps>) => {
  const type = CurrencyTypes.polygon;
  const {account, loadWallet, resetAccount} = useAccount(type);
  const {currencyPostfix} = useConfig(type);

  const {balance, isLoading: isBalanceLoading} = useBalance(
    account?.address,
    type,
  );

  const state: PolygonAccountContext = {
    account,
    balance,
    isBalanceLoading,
    currencyPostfix,
    loadWallet,
    resetAccount,
  };

  return (
    <PolygonAccountState.Provider value={state}>
      {children}
    </PolygonAccountState.Provider>
  );
};
We have different general hooks that can be specialized by the given type, we can reuse these hooks in any token provider later. For example, if you want to extend the available accounts in the wallet with Arbitrum, the only thing that you have to do is define a new type, called Arbitrum, create a network-specific library, and the type-specific return values in the useConfig hook. And lastly, create a new Provider based on the Arbitrum type, similarly as we saw above.
Hooks
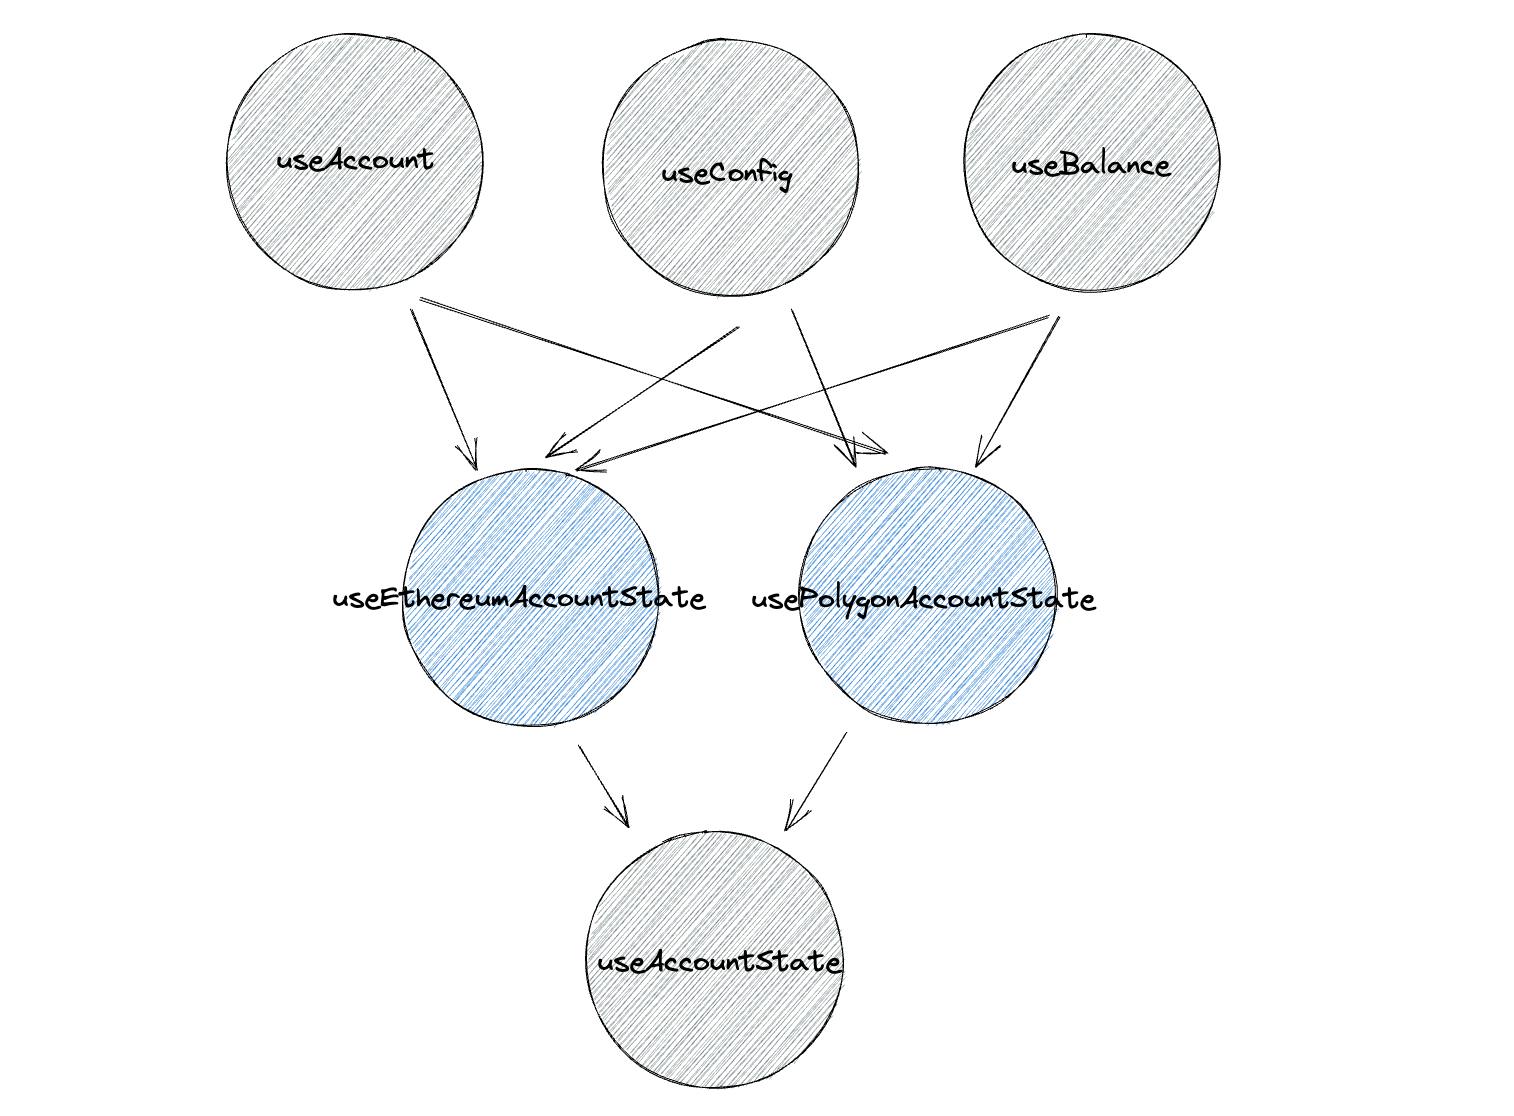
In this section, we will review the used custom hooks. The hierarchy of the hooks looks is shown in the figure below. We have low-level hooks to manage general logic and function parts (useAccount, useConfig, useBalance). On top of these, we have currency account providers using the general hooks. Following this approach, there will be easy-to-read and easily extendable providers, so in the future, we can add more tokens to the wallet much easier. And finally, we have the useAccountState hook to bring the currency accounts together and provide an easy-to-use account state to the application components.
The first hook is about storing an account and having some basic functionalities to handle it.
# src/hooks/useAccount.ts

export const useAccount: UseAccount = type => {
  const {lib} = useConfig(type);
  const [account, setAccount] = useState<Account | null>(null);

  const loadWallet = (privateKey: string | null) => {
    if (privateKey && lib) {
      setAccount(lib.privateKeyToAccount(privateKey));
    }
  };

  const resetAccount = () => {
    setAccount(null);
  };

  return {
    account,
    loadWallet,
    resetAccount,
  };
};
The useConfig hook is a collection of a few configurations, based on the given currency type. This hook enables to use of currency-type-specific configurations, and it makes it easy to define other tokens and their configurations. In the future, we can add as many token types as we want.
# src/hooks/useConfig.ts

export const useConfig: UseConfig = type => {
  const getApiUrl = () => {
    switch (type) {
      case CurrencyTypes.ethereum:
        return ETHEREUM_ENDPOINT;
      case CurrencyTypes.polygon:
        return POLYGON_ENDPOINT;
    }
  };

  const getLib = () => {
    switch (type) {
      case CurrencyTypes.ethereum:
        return ethLib;
      case CurrencyTypes.polygon:
        return polygonLib;
    }
  };

  const getCurrencyPostfix = () => {
    switch (type) {
      case CurrencyTypes.ethereum:
        return 'ETH';
      case CurrencyTypes.polygon:
        return 'MATIC';
    }
  };

  return {
    apiUrl: getApiUrl(),
    lib: getLib(),
    currencyPostfix: getCurrencyPostfix(),
  };
};
It is also necessary to update the useBalance hook from the previous chapter since we need to support two currencies now. Some parts of the state variables will load dynamically based on the given currency type.
# src/hooks/useBalance.ts

export const useBalance: UseBalance = (address, type) => {
  const [balance, setBalance] = useState<string | null>(null);
  const {isLoading, withLoading} = useLoading();
  const {lib, currencyPostfix} = useConfig(type);

  const getBalance = () =>
    withLoading(async (): Promise<null | string> => {
      if (!address || !lib) {
        return null;
      }
      return lib.getBalance(address);
    });

  useEffect(() => {
    if (!address) {
      setBalance(null);
    } else {
      getBalance().then(setBalance);
    }

    // eslint-disable-next-line react-hooks/exhaustive-deps
  }, [address]);

  return {
    isLoading,
    balance,
    balanceText: `${balance ?? 'NaN'} ${currencyPostfix}`,
  };
};
And lastly, let's define a hook to keep the different accounts together and provide a state interface for the other parts of the application. It provides functionalities to handle the account actions simultaneously, like loading a wallet or resetting a wallet, since the address and the private key are the same. The state value object contains the available tokens, where the token name is the key. An interesting concept here is that we use a simple hook instead of using a context for wrapping the token accounts. Because the separated account states are context values, those are similar to global variables within the Provider wrapper component, so there won't be multiple instants of the Ethereum and Polygon states. So the result of this is that basically, we can use the useAccountState hook as many times as we want within the Ethereum and Polygon Provider wrappers, we won't produce more instants of their states. We will have multiple instances from the state variable within the useAccountState though, which can cause extra memory usage if we use it multiple times in a given component tree, especially if we have a large state. For now, this is not the case, so for the sake of simplicity we use a hook, but at a later point, we may have to convert it to a provider.
# src/hooks/useAccountState.ts

export const useAccountState: UseAccountState = () => {
  const ethState = useEthereumAccountState();
  const polygonState = usePolygonAccountState();

  const state: State = {
    [CurrencyTypes.ethereum]: {
      account: ethState.account,
      balance: ethState.balance,
      isBalanceLoading: ethState.isBalanceLoading,
      currencyPostfix: ethState.currencyPostfix,
    },
    [CurrencyTypes.polygon]: {
      account: polygonState.account,
      balance: polygonState.balance,
      isBalanceLoading: polygonState.isBalanceLoading,
      currencyPostfix: polygonState.currencyPostfix,
    },
  };

  const getStateSlice = (key: CurrencyTypes): Slice => {
    return state[key];
  };

  const loadWallet = (privateKey: string | null) => {
    if (privateKey) {
      ethState.loadWallet(privateKey);
      polygonState.loadWallet(privateKey);
    }
  };

  const resetAccount = () => {
    ethState.resetAccount();
    polygonState.resetAccount();
  };

  const hasAccount = (): boolean => {
    return Object.keys(state).some(slice => state[slice].account);
  };

  return {
    state,
    getStateSlice,
    loadWallet,
    resetAccount,
    hasAccount,
  };
};
For using the new functionalities, we have to update the imports of the loadWallet function in the CreateWallet.tsx , RestoreWallet.tsx, and Login.tsx files, and we also have to update the resetAccount function in the Account.tsx file.
...
const {loadWallet} = useAccountState();
...
Libraries
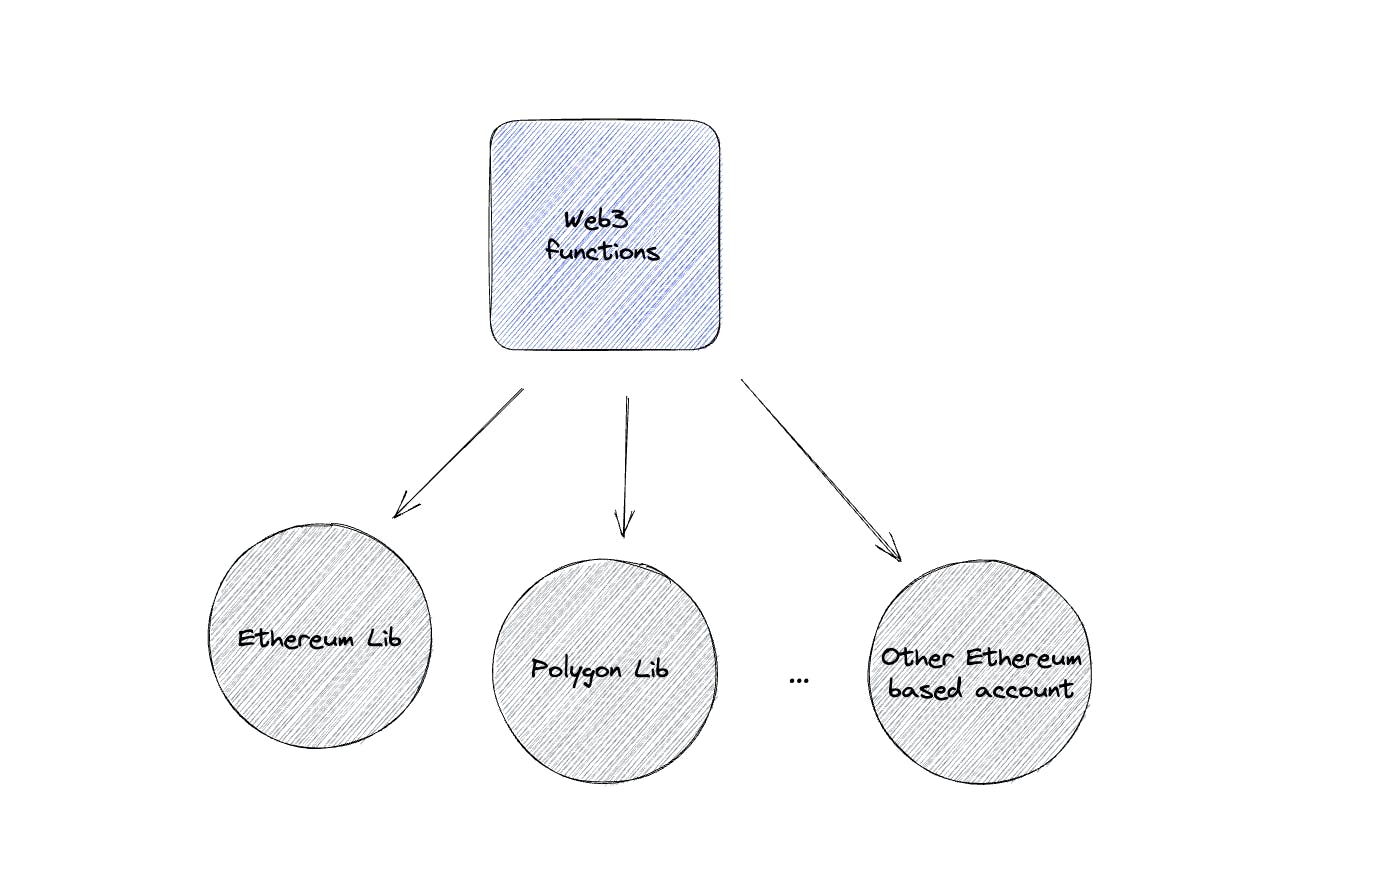
Based on the idea to make the code reusable across tokens, we need to review the Ethereum library code and reorganize it. If you are familiar with the SOLID design principles, you may have heard about the Open-Closed Principle. This means in our case, that we want to build a general collection of web3 functionalities that the specific currency files can extend with their own functionalities. At this point, we only have two functions in the app, but as we build the app further, we will add more functionalities to this file.
# src/libs/web3/index.ts

export const web3LibBuilder = (web3Instance: Web3): Web3Instance => {
  const privateKeyToAccount = (privateKey: string): Account =>
    web3Instance.eth.accounts.privateKeyToAccount(privateKey, true);

  const getBalance = async (address: string): Promise<string> => {
    const balance = await web3Instance.eth.getBalance(address);
    return web3Instance.utils.fromWei(balance, 'ether');
  };
  return {
    privateKeyToAccount,
    getBalance,
  };
};
And now we can have separate lib files for Ethereum and Polygon based on the general web3LibBuilder.
# src/libs/ethereum/index.ts

const Web3Instance = new Web3(
  new Web3.providers.HttpProvider(ETHEREUM_ENDPOINT),
);
export const ethLib = web3LibBuilder(Web3Instance);
# src/libs/polygon/index.ts

const Web3Instance = new Web3(
  new Web3.providers.HttpProvider(POLYGON_ENDPOINT),
);
export const polygonLib = web3LibBuilder(Web3Instance);
Components
Now we have the background functionalities to extend the app with a Polygon account. Let's review the components and build the visual elements of the new feature. Probably you have already seen this type of card design in several fintech apps, the next section will cover how to build it with React Native.

For this layout, we need a Pager component to be able to swipe through the accounts, and we also have a Card component with the account info. For the pager view, we use react-native-pager-view , so at first, we need to install it with the well-known command npm i react-native-pager-view.
For the bottom pagination animation, we track the scroll event on the pager component and change the position of the circle based on these values. For the pager, we use a typical React pattern as rendering the child components inside the scrollable view. So theoretically we can use this component as a wrapper around anything in we want to scroll through in the future. For now, we will use it for crypto account cards.
# src/components/pager.ts

const AnimatedPagerView = Animated.createAnimatedComponent(PagerView);

export const Pager: React.FunctionComponent<PropsWithChildren<Props>> = ({
  children,
  onPageSelected,
}) => {
  const scrollOffsetAnimatedValue = useRef(new Animated.Value(0)).current;
  const positionAnimatedValue = useRef(new Animated.Value(0)).current;

  const childrenLength =
    children && Array.isArray(children) ? children.length : 1;

  return (
    <View style={styles.pagerView}>
      <AnimatedPagerView
        style={styles.content}
        initialPage={0}
        onPageSelected={position =>
          onPageSelected?.(position.nativeEvent.position)
        }
        orientation={'horizontal'}
        onPageScroll={Animated.event<PagerViewOnPageScrollEventData>(
          [
            {
              nativeEvent: {
                offset: scrollOffsetAnimatedValue,
                position: positionAnimatedValue,
              },
            },
          ],
          {
            useNativeDriver: true,
          },
        )}>
        {children}
      </AnimatedPagerView>
      <View style={styles.contentContainer}>
        <Pagination
          dataLength={childrenLength}
          positionAnimatedValue={positionAnimatedValue}
          scrollOffsetAnimatedValue={scrollOffsetAnimatedValue}
        />
      </View>
    </View>
  );
};
The pagination component is pretty simple. The dataLength input property can define how many dots we need and a circle item moves based on the input offset and position values.
# src/components/pagination.ts

export const Pagination: React.FunctionComponent<Props> = ({
  dataLength,
  scrollOffsetAnimatedValue,
  positionAnimatedValue,
}) => {
  const inputRange = [0, dataLength];
  const translateX = Animated.add(
    scrollOffsetAnimatedValue,
    positionAnimatedValue,
  ).interpolate({
    inputRange,
    outputRange: [0, dataLength * DOT_SIZE],
  });

  return (
    <View style={styles.pagination}>
      <Animated.View
        style={[
          styles.paginationIndicator,
          {
            transform: [{translateX: translateX}],
          },
        ]}
      />
      {new Array(dataLength).fill(0).map((_, index) => (
        <View key={index} style={styles.paginationDotContainer}>
          <View style={styles.paginationDot} />
        </View>
      ))}
    </View>
  );
};
The card component is even simpler. It is a stateless layout showing the input data properties. It has two Pressable actions, receiving and sending a transaction. Even though we will cover these actions later, we can define the handlers as input properties.
# src/components/currencyCard.ts

export const CurrencyCard: React.FunctionComponent<Props> = ({
  name,
  balance,
  postfix,
  onReceive,
  onSend,
}) => {
  return (
    <View style={styles.currencyCard}>
      <CurrencyBalance
        name={name}
        balance={balance ?? ''}
        postfix={postfix ?? ''}
      />
      <View style={styles.actionPanel}>
        <Pressable style={styles.iconButtonContainer} onPress={onReceive}>
          <View style={styles.iconButton}>
            <ArrowDownTray width={24} height={24} color={BLACK} />
          </View>
          <Text style={styles.iconText}>Receive</Text>
        </Pressable>
        <Pressable style={styles.iconButtonContainer} onPress={onSend}>
          <View style={styles.iconButton}>
            <PaperAirplane width={24} height={24} color={BLACK} />
          </View>
          <Text style={styles.iconText}>Send</Text>
        </Pressable>
      </View>
    </View>
  );
};


const styles = StyleSheet.create({
  currencyCard: {
    paddingVertical: 24,
    paddingHorizontal: 32,
    width: '90%',
    backgroundColor: BLUE,
    marginLeft: 12,
    borderRadius: 12,
    gap: 32,
    shadowColor: '#000',
    shadowOffset: {
      width: 2,
      height: 2,
    },
    shadowOpacity: 0.5,
    shadowRadius: 4,
    elevation: 5,
  },
  actionPanel: {
    flexDirection: 'row',
    justifyContent: 'center',
    gap: 40,
  },
  iconButtonContainer: {
    justifyContent: 'center',
    alignItems: 'center',
    gap: 8,
  },
  iconButton: {
    padding: 8,
    borderRadius: 100,
    backgroundColor: WHITE,
  },
  iconText: {
    color: WHITE,
  },
});
And as the last step, let's wire the new functionalities and components together on the Home page. As you can see, the onReceive and onSend functions are not defined yet, we will handle those once we will build the transaction feature. As we saw earlier, the state value contains the account names as keys. For generating a list, we reorganize this state to be able to simply iterate through it and render the cards. Don't forget to define the key property on the Card component to give a stable identity to it and let React identify which element changed. And lastly, as a small UX addition, while the initial balance loading is happening, the app shows a loading indicator.
# src/screens/Home.tsx

export const HomeScreen: React.FunctionComponent<Props> = ({}) => {
  const [selectedIndex, setSelectedIndex] = useState<number>(0);
  const {state} = useAccountState();

 const data = Object.keys(state).map(acc => ({
    name: acc as CurrencyTypes,
    account: state[acc]?.account ?? null,
    balance: state[acc]?.balance ?? '',
    postfix: state[acc]?.currencyPostfix,
  }));

  const isLoading = Object.keys(state).some(
    acc => state[acc]?.isBalanceLoading,
  );

  return (
     <SafeArea>
      <View style={styles.container}>
        <View style={styles.content}>
          {isLoading ? (
            <ActivityIndicator size={'small'} color={BLUE} />
          ) : (
            <Pager onPageSelected={setSelectedIndex}>
              {data.map(currencyData => (
                <CurrencyCard
                  key={currencyData.name}
                  name={currencyData.name}
                  balance={currencyData.balance}
                  postfix={currencyData.postfix}
                  onReceive={() => ({})}
                  onSend={() => ({})}
                />
              ))}
            </Pager>
          )}
        </View>
      </View>
    </SafeArea>
  );
};
Final thoughts
In the second chapter, we discovered how we can support more tokens and add more accounts to our wallet app. The primary goal was to build a front-end architecture that supports the multi-currency environment. Based on the structures, in the future, we can easily introduce more Ethereum-based tokens and build our app capacity further.
I have a lot of plans to build this wallet app further, so stay tuned for the upcoming chapters. Here is a little sneak peek about the following two chapters:
Sending transactions on Ethereum and Polygon networks: At the end of this chapter, you will be able to send transactions from the wallet application. I will show you how you can use the Polygon faucet to add some initial MATIC tokens to your test account and then send tokens from one account to another. At the end of the chapter, we will verify that the transactions really happened on the Polygon network.
Building transaction history from network scan data: In this chapter, we will build a nice transaction history UI by listing only a few latest transactions and with the option to review all the transactions that happened in the past. We will use ether and polygon scan APIs to collect the transaction data.